How to Produce Your Own Biogas: A Complete Step-by-Step Guide to Home Renewable Energy
Producing your own biogas is one of the most effective ways to turn daily kitchen waste into clean, renewable cooking fuel. As a biogas expert, I’ve seen how this “black magic” of biology can empower households to reduce their carbon footprint and save on energy costs.
Below is a professional, step-by-step guide to setting up and managing your own anaerobic digester.
Choose Your Biogas Feedstock
Not all organic waste is created equal. To get the best methane yield, you need a balanced “diet” for your bacteria.
- The Best Ingredients: Food scraps (fruit peels, leftovers), animal manure (cow, pig, or chicken), and soft green garden waste.
- The “Inoculum” (Starter): To jumpstart the process, you need a high concentration of anaerobic bacteria. Fresh cow manure mixed with water is the gold standard for starting a new system.
- What to Avoid: Large amounts of citrus (too acidic), woody sticks (too much lignin), and oils or fats (can create a “scum” layer that traps gas).
Prepare the Slurry (The 1:1 Rule)
Bacteria cannot eat solid food; they need it in a liquid form.
- Mashing: Grind or chop food waste into small pieces to increase the surface area.
- Dilution: Mix your waste with water in a 1:1 ratio. If you have 1kg of food waste, add 1 liter of water.
- Consistency: The result should be a “slurry” similar to a thick soup or house paint.
Set Up Your Anaerobic Digester
Your digester is the “stomach” of the system. You can build a DIY version using an IBC tank or purchase a pre-made kit.
- The Inlet: A pipe where you pour your slurry. It should extend near the bottom of the tank so oxygen doesn’t enter the main chamber.
- The Digestion Tank: This must be 100% airtight. Oxygen is the enemy of methane-producing bacteria.
- The Gas Outlet: A valve at the very top of the tank where the gas will collect and be piped to your stove.
- The Outlet (Fertilizer): As you add new waste, the “digestate” (spent waste) is pushed out. Don’t throw this away! It is an odorless, nutrient-rich liquid fertilizer for your garden.
Maintain the “Mesophilic” Temperature
Biogas bacteria are like humans—they work best when they are warm.
- Ideal Range: Between 30°C and 40°C (86°F–104°F).
- Cold Climates: If you live in a cooler area, you must insulate your tank with foam or bubble wrap, or place it inside a small greenhouse. If the temperature drops below 15°C (60°F), gas production will virtually stop.
Purifying the Gas (Scrubbing)
Raw biogas contains methane (the fuel) and CO₂, but it also contains small amounts of Hydrogen Sulfide. This is what creates a “rotten egg” smell and can corrode metal stoves.
- The Solution: Run your gas line through a small “scrubber”—a PVC tube filled with steel wool or iron filings. This reacts with the Hydrogen Sulfide and cleans the gas.
Testing and Using Your Gas
- The First Week: The first gas produced will be mostly CO₂ and won’t burn. Vent this out safely.
- The Flame Test: Once the methane concentration reaches about 50–60%, you will get a steady, blue flame on your biogas stove.
- Safety First: Methane is flammable. Always keep your digester outdoors in a well-ventilated area and check for leaks using soapy water on the joints.
Expert Tip: Don’t Overfeed!
The most common mistake beginners make is adding too much food too fast, which makes the system “sour” (too acidic). Start slow, monitor the gas, and increase the feed as the bacterial colony grows.
Building a 1,000-liter biogas system is a popular DIY project that typically utilizes an IBC (Intermediate Bulk Container) as the main digestion tank. This size is ideal for a single household, capable of processing about 5 gallons of food waste daily to produce 1–2 hours of cooking gas.
Core Tank & Storage Components
The foundation of your system requires two primary containers to separate the digestion process from gas storage.
- Digester Tank: 1 pc 1,000-liter IBC Tank. These are standard industrial containers often available second-hand; ensure it is food-grade or thoroughly cleaned.
- Gas Holder: 1 pc 200-liter Blue Plastic Drum (for a floating-drum design) or 1–2 Large Tractor/Truck Tire Tubes for flexible, low-cost storage.
- Slurry Bucket: 1 pc 20-liter (5-gallon) bucket with a lid to serve as the mixing and feeding stati
PVC Pipes & Fittings (Bill of Materials)
To connect your “artificial gut,” you will need various diameters of PVC to handle different materials (solids vs. gas).
- Inlet System (Feeding):
- 1 pc 4-inch PVC Pipe (approx. 4 feet long).
- 1 pc 4-inch Uniseal or bulkhead fitting to create an airtight seal at the tank entry.
- 1 pc 4-inch PVC Cap or a large funnel for the top of the feed pipe.
- Outlet System (Fertilizer):
- 1 pc 2-inch PVC Pipe (approx. 10 feet total).
- 1 pc 2-inch Uniseal or bulkhead.
- 1 pc 2-inch PVC Sanitary T-junction and 90-degree Elbow.
- Gas Line & Scrubbing:
- 1/2-inch PVC Pipe segments and 1/2-inch flexible gas hose (approx. 15–20 meters depending on distance to stove).
- 2 pcs 1/2-inch PVC Ball Valves (one for the digester outlet, one near the stove).
- 1 pc H2S Scrubber: Built using two 2-inch PVC pipe segments (1 foot each) with 2-inch to 1/2-inch reducers on both ends, filled with steel wool.
Essential Adhesives & Tools
Airtightness is the single most important factor for success.
- Sealing: PVC Solvent Cement, Silicone Sealant (for external joints), and Teflon Tape for all threaded connections.
- Drilling: A power drill with Hole Saw attachments (specifically a 5-inch hole saw for 4-inch Uniseals and a 3-inch for 2-inch fittings).
- Finish: Black spray paint for the IBC tank; this prevents algae growth and helps the tank absorb solar heat to maintain digestion temperatures
The IBC Biogas Digester Blueprint
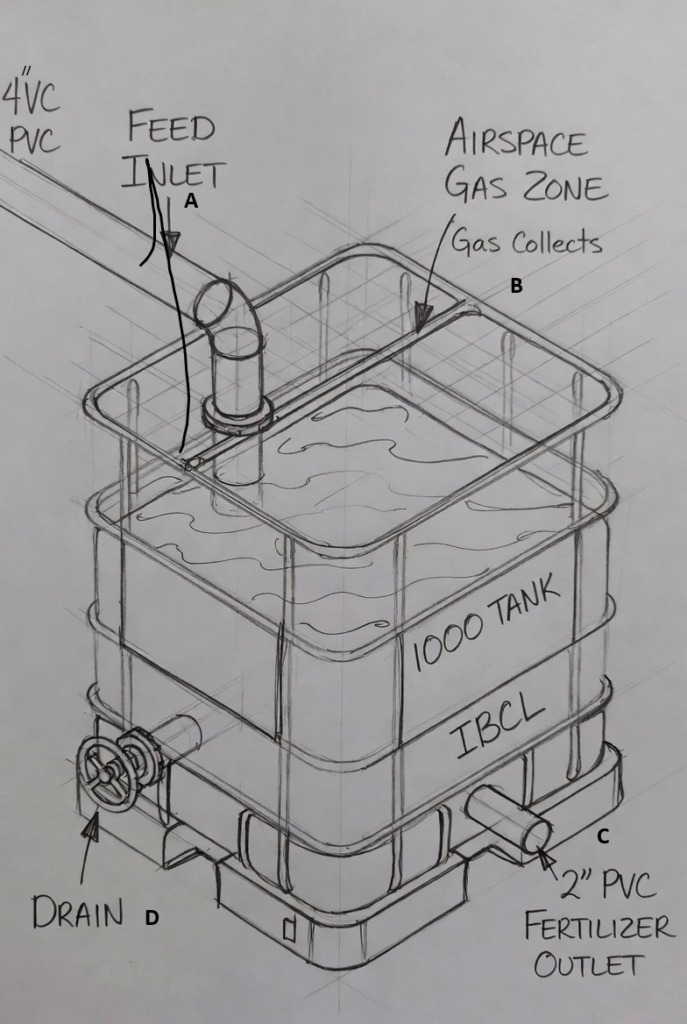
Where to Drill: The “Drill Map”
To maximize pressure and prevent clogs, you must place your holes precisely on the IBC tank.
Location A: The Feeding Inlet (Top Side)
- Hole Size: 5-inch (to fit a 4-inch Uniseal and Pipe).
- Position: Top surface of the IBC, near one corner.
- The Pro Move: Extend the 4″ pipe inside the tank until it is only 6 inches from the bottom. This creates a “liquid seal” that prevents gas from escaping back up the feed pipe.
Location B: The Gas Outlet (Top Center)
- Hole Size: 1-inch (to fit a 1/2-inch bulkhead).
- Position: The highest point of the tank (usually the center cap of the IBC).
- The Pro Move: Use a flexible hose here. As the tank slightly expands from gas pressure, a rigid pipe might crack or leak.
Location C: The Fertilizer Overflow (Opposite Side)
- Hole Size: 3-inch (to fit a 2-inch Uniseal and Pipe).
- Position: On the vertical wall, about 10 inches down from the top.
- The Pro Move: This acts as your “auto-level.” When you pour 5 gallons of waste into the inlet, 5 gallons of liquid fertilizer will automatically push out of this pipe.
The Gas Flow Path (After the Tank)
Once the gas leaves Location B, it should follow this specific order to ensure safety and flame quality:
- Water Trap: A simple “U” bend in the hose to collect condensation so water doesn’t reach your stove.
- H2S Scrubber: The PVC tube filled with steel wool to remove the “rotten egg” smell.
- Check Valve: A one-way valve to prevent a “backfire” from the stove reaching the tank.
- Manometer: A clear U-shaped tube with water used to measure the gas pressure.
Expert Checklist for Your First Week
| Feature | Requirement |
| Air Tightness | Fill the tank with a little air and spray soapy water on all joints. If it bubbles, seal it again. |
| Light Exposure | Paint the tank Matte Black. This kills algae and absorbs heat. |
| Inoculation | Fill the tank 50% with water and 10% with fresh manure before adding food waste. |